
主题
MDX
Markdown 是一种用于格式化文本的轻量级标记语言。它允许你使用纯文本语法进行编写并将其转换为结构有效的 HTML。它通常用于在网站和博客上编写内容。
¥Markdown is a lightweight markup language used to format text. It allows you to write using plain text syntax and convert it to structurally valid HTML. It's commonly used for writing content on websites and blogs.
你写...
¥You write...
md
I **love** using [Next.js](https://next.nodejs.cn/)输出:
¥Output:
html
<p>I <strong>love</strong> using <a href="https://next.nodejs.cn/">Next.js</a></p>MDX 是 Markdown 的超集,可让你直接在 Markdown 文件中写入 JSX。这是在内容中添加动态交互性和嵌入 React 组件的强大方法。
¥MDX is a superset of markdown that lets you write JSX directly in your markdown files. It is a powerful way to add dynamic interactivity and embed React components within your content.
Next.js 可以支持应用内的本地 MDX 内容,以及在服务器上动态获取的远程 MDX 文件。Next.js 插件负责将 markdown 和 React 组件转换为 HTML,包括支持在服务器组件中使用(App Router 中的默认设置)。
¥Next.js can support both local MDX content inside your application, as well as remote MDX files fetched dynamically on the server. The Next.js plugin handles transforming markdown and React components into HTML, including support for usage in Server Components (the default in App Router).
需要了解:查看 档案入门套件 模板以获取完整的工作示例。
¥Good to know: View the Portfolio Starter Kit template for a complete working example.
安装依赖
¥Install dependencies
@next/mdx 包和相关包用于配置 Next.js,以便它可以处理 markdown 和 MDX。它从本地文件获取数据,允许你直接在 /pages 或 /app 目录中创建具有 .md 或 .mdx 扩展名的页面。
¥The @next/mdx package, and related packages, are used to configure Next.js so it can process markdown and MDX. It sources data from local files, allowing you to create pages with a .md or .mdx extension, directly in your /pages or /app directory.
安装这些包以使用 Next.js 渲染 MDX:
¥Install these packages to render MDX with Next.js:
bash
npm install @next/mdx @mdx-js/loader @mdx-js/react @types/mdx配置 next.config.mjs
¥Configure next.config.mjs
更新项目根目录下的 next.config.mjs 文件以将其配置为使用 MDX:
¥Update the next.config.mjs file at your project's root to configure it to use MDX:
js
import createMDX from '@next/mdx'

/** @type {import('next').NextConfig} */
const nextConfig = {
  // Configure `pageExtensions` to include markdown and MDX files
  pageExtensions: ['js', 'jsx', 'md', 'mdx', 'ts', 'tsx'],
  // Optionally, add any other Next.js config below
}

const withMDX = createMDX({
  // Add markdown plugins here, as desired
})

// Merge MDX config with Next.js config
export default withMDX(nextConfig)
这允许 .md 和 .mdx 文件充当应用中的页面、路由或导入。
¥This allows .md and .mdx files to act as pages, routes, or imports in your application.
添加 mdx-components.tsx 文件
¥Add an mdx-components.tsx file
在项目根目录中创建一个 mdx-components.tsx(或 .js)文件来定义全局 MDX 组件。例如,与 pages 或 app 处于同一级别,或者在 src 内部(如果适用)。
¥Create an mdx-components.tsx (or .js) file in the root of your project to define global MDX Components. For example, at the same level as pages or app, or inside src if applicable.
tsx
import type { MDXComponents } from 'mdx/types'

export function useMDXComponents(components: MDXComponents): MDXComponents {
  return {
    ...components,
  }
}
js
export function useMDXComponents(components) {
  return {
    ...components,
  }
}
需要了解:
¥Good to know:
mdx-components.tsx需要将@next/mdx与 App Router 一起使用,没有它就无法工作。¥
mdx-components.tsxis required to use@next/mdxwith App Router and will not work without it.了解有关
mdx-components.tsxfile convention 的更多信息。¥Learn more about the
mdx-components.tsxfile convention.了解如何 使用自定义样式和组件。
¥Learn how to use custom styles and components.
渲染 MDX
¥Rendering MDX
你可以使用 Next.js 的基于文件的路由或通过将 MDX 文件导入其他页面来渲染 MDX。
¥You can render MDX using Next.js's file based routing or by importing MDX files into other pages.
使用基于文件的路由
¥Using file based routing
使用基于文件的路由时,你可以像使用任何其他页面一样使用 MDX 页面。
¥When using file based routing, you can use MDX pages like any other page.
在 App Router 应用中,这包括能够使用 metadata。
¥In App Router apps, that includes being able to use metadata.
在 /app 目录中创建一个新的 MDX 页面:
¥Create a new MDX page within the /app directory:
txt
  my-project
  ├── app
  │   └── mdx-page
  │       └── page.(mdx/md)
  |── mdx-components.(tsx/js)
  └── package.json
你可以在这些文件中使用 MDX,甚至可以直接在 MDX 页面中导入 React 组件:
¥You can use MDX in these files, and even import React components, directly inside your MDX page:
mdx
import { MyComponent } from 'my-component'

# Welcome to my MDX page!

This is some **bold** and _italics_ text.

This is a list in markdown:

- One
- Two
- Three

Checkout my React component:

<MyComponent />
导航到 /mdx-page 路由应显示渲染的 MDX 页面。
¥Navigating to the /mdx-page route should display your rendered MDX page.
使用导入
¥Using imports
在 /app 目录中创建一个新页面,并在任意位置创建一个 MDX 文件:
¥Create a new page within the /app directory and an MDX file wherever you'd like:
txt
  .
  ├── app/
  │   └── mdx-page/
  │       └── page.(tsx/js)
  ├── markdown/
  │   └── welcome.(mdx/md)
  ├── mdx-components.(tsx/js)
  └── package.json
你可以在这些文件中使用 MDX,甚至可以直接在 MDX 页面中导入 React 组件:
¥You can use MDX in these files, and even import React components, directly inside your MDX page:
mdx
import { MyComponent } from 'my-component'

# Welcome to my MDX page!

This is some **bold** and _italics_ text.

This is a list in markdown:

- One
- Two
- Three

Checkout my React component:

<MyComponent />
页面内部导入 MDX 文件即可显示内容:
¥Import the MDX file inside the page to display the content:
tsx
import Welcome from '@/markdown/welcome.mdx'

export default function Page() {
  return <Welcome />
}
jsx
import Welcome from '@/markdown/welcome.mdx'

export default function Page() {
  return <Welcome />
}
导航到 /mdx-page 路由应显示渲染的 MDX 页面。
¥Navigating to the /mdx-page route should display your rendered MDX page.
使用动态导入
¥Using dynamic imports
你可以导入动态 MDX 组件,而不是对 MDX 文件使用文件系统路由。
¥You can import dynamic MDX components instead of using filesystem routing for MDX files.
例如,你可以有一个动态路由段,从单独的目录加载 MDX 组件:
¥For example, you can have a dynamic route segment which loads MDX components from a separate directory:
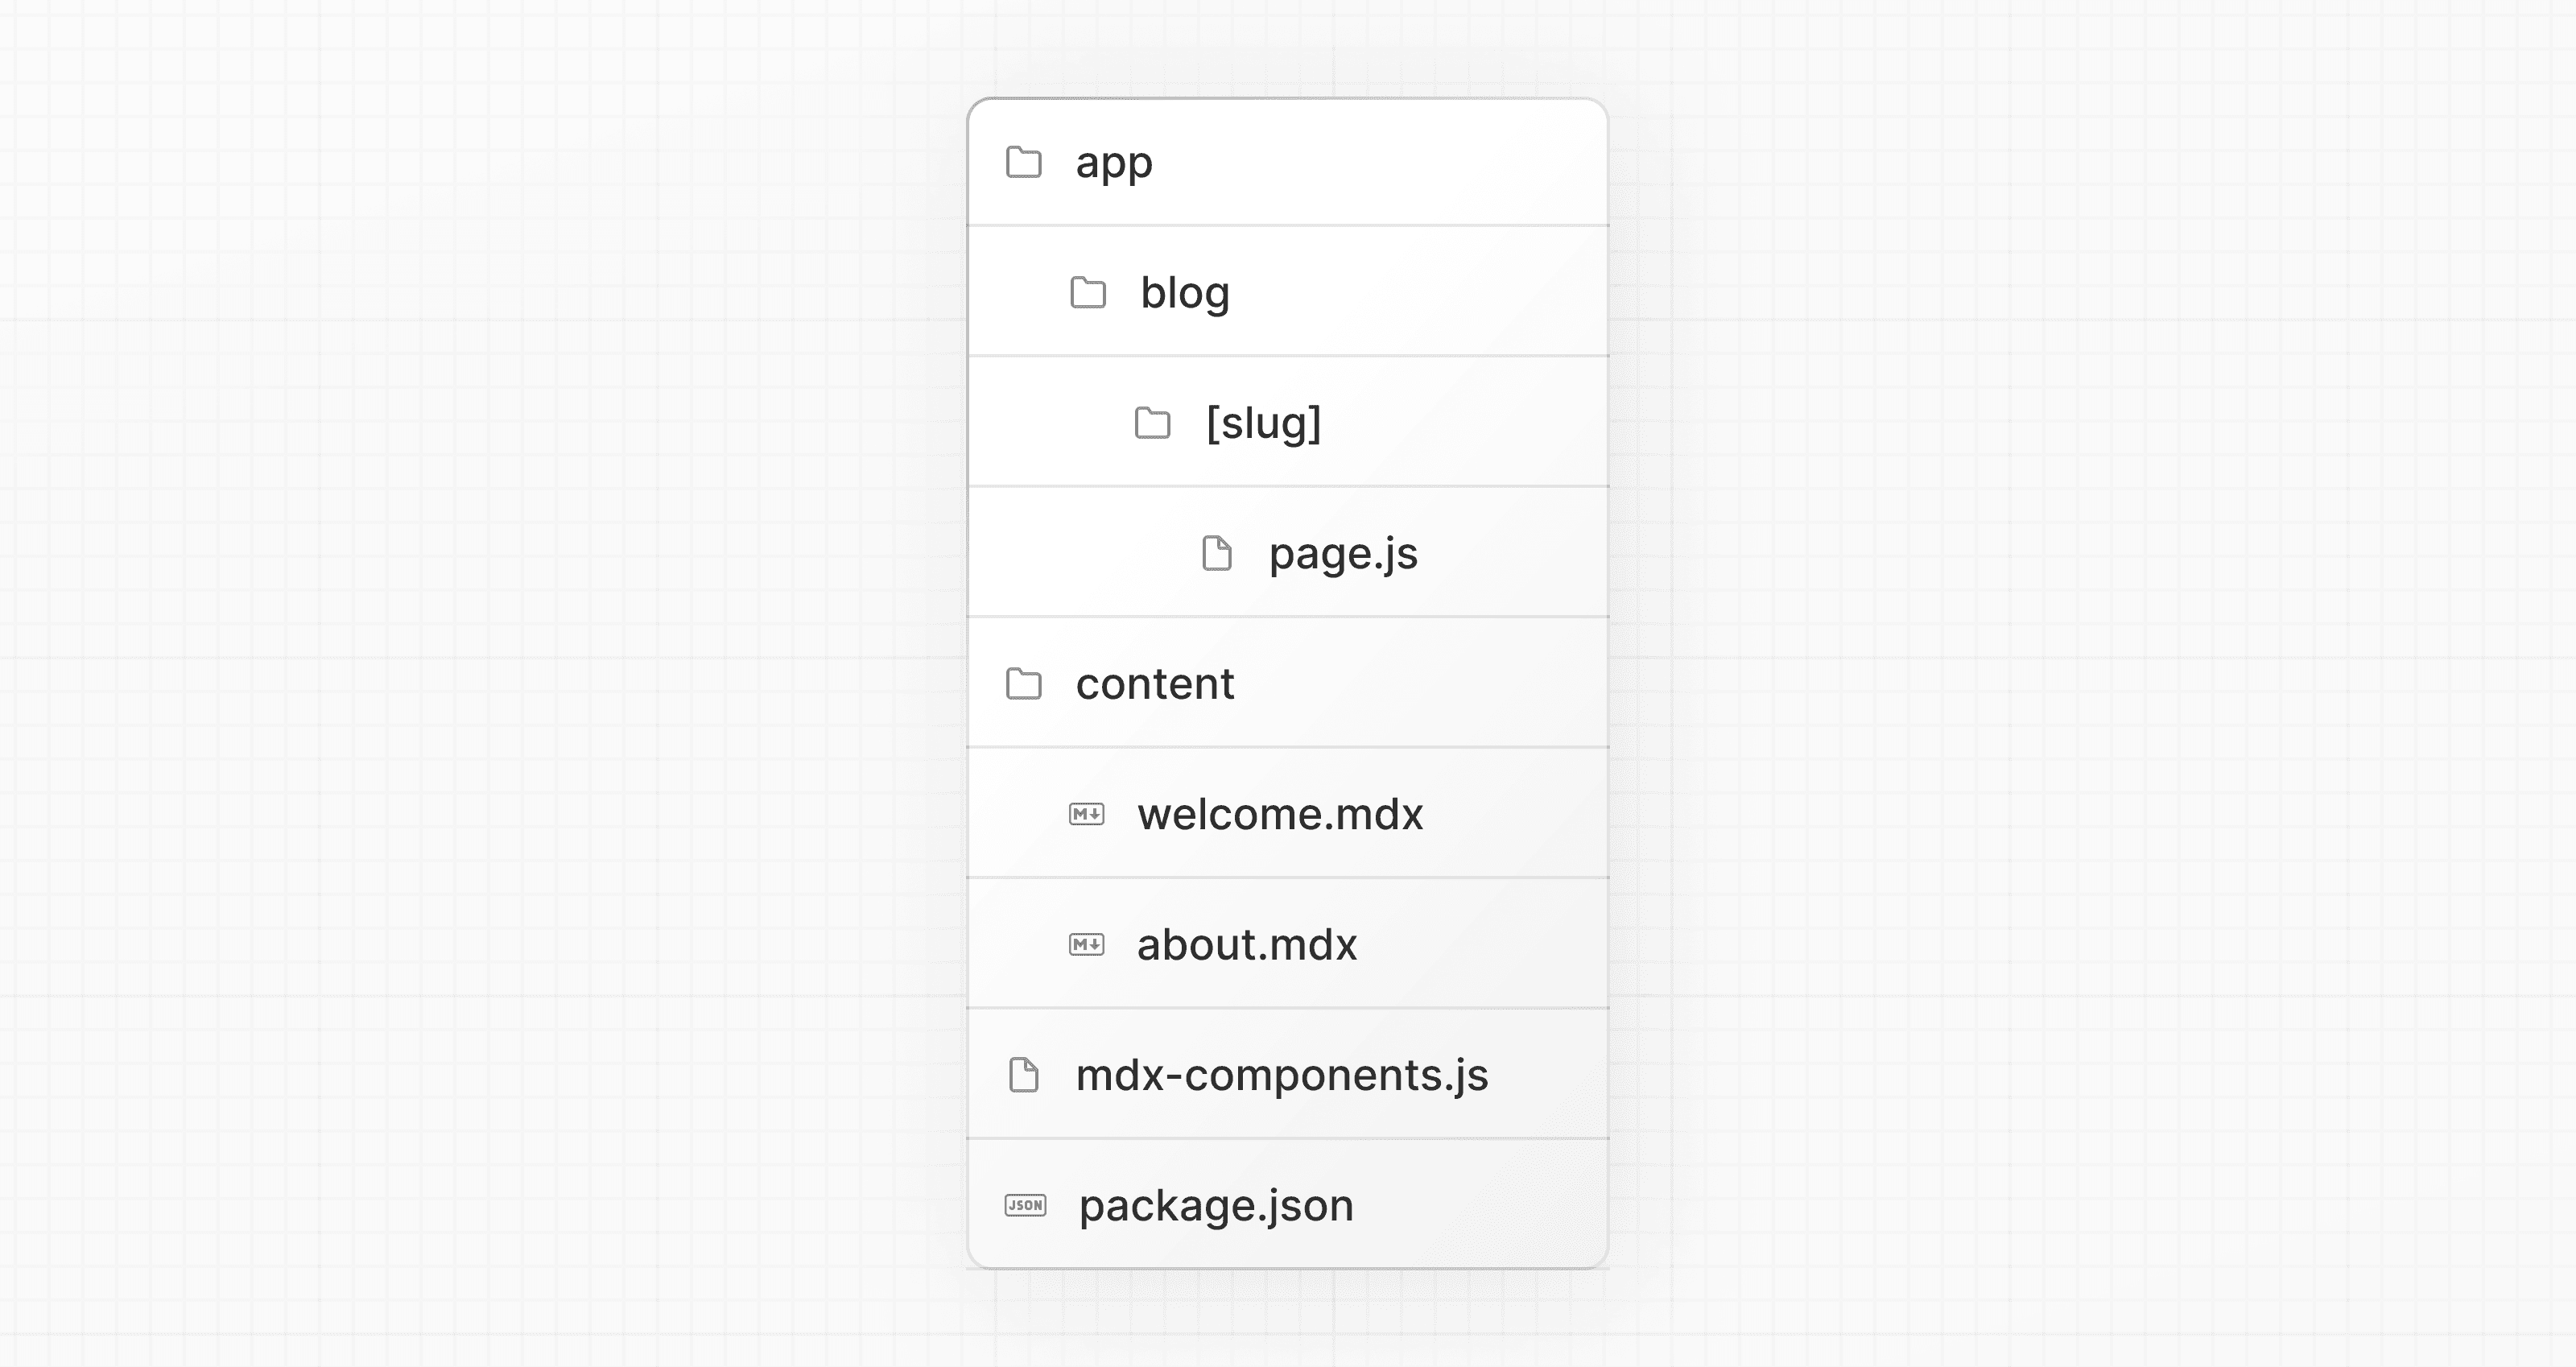
generateStaticParams 可用于预渲染提供的路由。通过将 dynamicParams 标记为 false,访问未在 generateStaticParams 中定义的路由将 404。
¥generateStaticParams can be used to prerender the provided routes. By marking dynamicParams as false, accessing a route not defined in generateStaticParams will 404.
tsx
export default async function Page({
  params,
}: {
  params: Promise<{ slug: string }>
}) {
  const { slug } = await params
  const { default: Post } = await import(`@/content/${slug}.mdx`)

  return <Post />
}

export function generateStaticParams() {
  return [{ slug: 'welcome' }, { slug: 'about' }]
}

export const dynamicParams = false
jsx
export default async function Page({ params }) {
  const { slug } = await params
  const { default: Post } = await import(`@/content/${slug}.mdx`)

  return <Post />
}

export function generateStaticParams() {
  return [{ slug: 'welcome' }, { slug: 'about' }]
}

export const dynamicParams = false
需要了解:确保在导入中指定
.mdx文件扩展名。虽然不需要使用 模块路径别名(例如@/content),但它确实简化了你的导入路径。¥Good to know: Ensure you specify the
.mdxfile extension in your import. While it is not required to use module path aliases (e.g.,@/content), it does simplify your import path.
使用自定义样式和组件
¥Using custom styles and components
Markdown 在渲染时会映射到原生 HTML 元素。例如,编写以下 markdown:
¥Markdown, when rendered, maps to native HTML elements. For example, writing the following markdown:
md
## This is a heading

This is a list in markdown:

- One
- Two
- Three
生成以下 HTML:
¥Generates the following HTML:
html
<h2>This is a heading</h2>

<p>This is a list in markdown:</p>

<ul>
  <li>One</li>
  <li>Two</li>
  <li>Three</li>
</ul>
要设计 Markdown 的样式,你可以提供映射到生成的 HTML 元素的自定义组件。样式和组件可以在全局、本地和共享布局中实现。
¥To style your markdown, you can provide custom components that map to the generated HTML elements. Styles and components can be implemented globally, locally, and with shared layouts.
全局样式和组件
¥Global styles and components
在 mdx-components.tsx 中添加样式和组件将影响应用中的所有 MDX 文件。
¥Adding styles and components in mdx-components.tsx will affect all MDX files in your application.
tsx
import type { MDXComponents } from 'mdx/types'
import Image, { ImageProps } from 'next/image'

// This file allows you to provide custom React components
// to be used in MDX files. You can import and use any
// React component you want, including inline styles,
// components from other libraries, and more.

export function useMDXComponents(components: MDXComponents): MDXComponents {
  return {
    // Allows customizing built-in components, e.g. to add styling.
    h1: ({ children }) => (
      <h1 style={{ color: 'red', fontSize: '48px' }}>{children}</h1>
    ),
    img: (props) => (
      <Image
        sizes="100vw"
        style={{ width: '100%', height: 'auto' }}
        {...(props as ImageProps)}
      />
    ),
    ...components,
  }
}
js
import Image from 'next/image'

// This file allows you to provide custom React components
// to be used in MDX files. You can import and use any
// React component you want, including inline styles,
// components from other libraries, and more.

export function useMDXComponents(components) {
  return {
    // Allows customizing built-in components, e.g. to add styling.
    h1: ({ children }) => (
      <h1 style={{ color: 'red', fontSize: '48px' }}>{children}</h1>
    ),
    img: (props) => (
      <Image
        sizes="100vw"
        style={{ width: '100%', height: 'auto' }}
        {...props}
      />
    ),
    ...components,
  }
}
本地样式和组件
¥Local styles and components
你可以通过将本地样式和组件传递到导入的 MDX 组件来将它们应用到特定页面。这些将合并并覆盖 全局样式和组件。
¥You can apply local styles and components to specific pages by passing them into imported MDX components. These will merge with and override global styles and components.
tsx
import Welcome from '@/markdown/welcome.mdx'

function CustomH1({ children }) {
  return <h1 style={{ color: 'blue', fontSize: '100px' }}>{children}</h1>
}

const overrideComponents = {
  h1: CustomH1,
}

export default function Page() {
  return <Welcome components={overrideComponents} />
}
jsx
import Welcome from '@/markdown/welcome.mdx'

function CustomH1({ children }) {
  return <h1 style={{ color: 'blue', fontSize: '100px' }}>{children}</h1>
}

const overrideComponents = {
  h1: CustomH1,
}

export default function Page() {
  return <Welcome components={overrideComponents} />
}
共享布局
¥Shared layouts
要跨 MDX 页面共享布局,你可以将 内置布局支持 与 App Router 结合使用。
¥To share a layout across MDX pages, you can use the built-in layouts support with the App Router.
tsx
export default function MdxLayout({ children }: { children: React.ReactNode }) {
  // Create any shared layout or styles here
  return <div style={{ color: 'blue' }}>{children}</div>
}
jsx
export default function MdxLayout({ children }) {
  // Create any shared layout or styles here
  return <div style={{ color: 'blue' }}>{children}</div>
}
使用 Tailwind 排版插件
¥Using Tailwind typography plugin
如果你使用 Tailwind 来设计应用的样式,则使用 @tailwindcss/typography 插件 将允许你在 Markdown 文件中重用 Tailwind 配置和样式。
¥If you are using Tailwind to style your application, using the @tailwindcss/typography plugin will allow you to reuse your Tailwind configuration and styles in your markdown files.
该插件添加了一组 prose 类,可用于将排版样式添加到来自源(例如 Markdown)的内容块。
¥The plugin adds a set of prose classes that can be used to add typographic styles to content blocks that come from sources, like markdown.
安装 Tailwind 排版 并与 共享布局 一起使用以添加所需的 prose。
¥Install Tailwind typography and use with shared layouts to add the prose you want.
tsx
export default function MdxLayout({ children }: { children: React.ReactNode }) {
  // Create any shared layout or styles here
  return (
    <div className="prose prose-headings:mt-8 prose-headings:font-semibold prose-headings:text-black prose-h1:text-5xl prose-h2:text-4xl prose-h3:text-3xl prose-h4:text-2xl prose-h5:text-xl prose-h6:text-lg dark:prose-headings:text-white">
      {children}
    </div>
  )
}
jsx
export default function MdxLayout({ children }) {
  // Create any shared layout or styles here
  return (
    <div className="prose prose-headings:mt-8 prose-headings:font-semibold prose-headings:text-black prose-h1:text-5xl prose-h2:text-4xl prose-h3:text-3xl prose-h4:text-2xl prose-h5:text-xl prose-h6:text-lg dark:prose-headings:text-white">
      {children}
    </div>
  )
}
一个常见的用例是当你想要迭代 MDX 集合并提取数据时。例如,从所有博客文章创建博客索引页。你可以使用 节点的 fs 模块 或 globby 等包来读取帖子目录并提取元数据。
¥A common use case for this is when you want to iterate over a collection of MDX and extract data. For example, creating a blog index page from all blog posts. You can use packages like Node's fs module or globby to read a directory of posts and extract the metadata.
需要了解:
¥Good to know:
使用
fs、globby等只能在服务器端使用。¥Using
fs,globby, etc. can only be used server-side.查看 档案入门套件 模板以获取完整的工作示例。
¥View the Portfolio Starter Kit template for a complete working example.
remark 和 rehype 插件
¥remark and rehype Plugins
你可以选择提供 remark 和 rehype 插件来转换 MDX 内容。
¥You can optionally provide remark and rehype plugins to transform the MDX content.
例如,你可以使用 remark-gfm 来支持 GitHub Flavored Markdown。
¥For example, you can use remark-gfm to support GitHub Flavored Markdown.
由于 remark 和 rehype 生态系统仅限 ESM,因此你需要使用 next.config.mjs 或 next.config.ts 作为配置文件。
¥Since the remark and rehype ecosystem is ESM only, you'll need to use next.config.mjs or next.config.ts as the configuration file.
js
import remarkGfm from 'remark-gfm'
import createMDX from '@next/mdx'

/** @type {import('next').NextConfig} */
const nextConfig = {
  // Allow .mdx extensions for files
  pageExtensions: ['js', 'jsx', 'md', 'mdx', 'ts', 'tsx'],
  // Optionally, add any other Next.js config below
}

const withMDX = createMDX({
  // Add markdown plugins here, as desired
  options: {
    remarkPlugins: [remarkGfm],
    rehypePlugins: [],
  },
})

// Combine MDX and Next.js config
export default withMDX(nextConfig)
使用 Turbopack 插件
¥Using Plugins with Turbopack
要将插件与 Turbopack 一起使用,请升级到最新的 @next/mdx 并使用字符串指定插件名称:
¥To use plugins with Turbopack, upgrade to the latest @next/mdx and specify plugin names using a string:
js
import createMDX from '@next/mdx'

/** @type {import('next').NextConfig} */
const nextConfig = {
  pageExtensions: ['js', 'jsx', 'md', 'mdx', 'ts', 'tsx'],
}

const withMDX = createMDX({
  options: {
    remarkPlugins: [],
    rehypePlugins: [['rehype-katex', { strict: true, throwOnError: true }]],
  },
})

export default withMDX(nextConfig)
需要了解:
¥Good to know:
由于 无法将 JavaScript 函数传递给 Rust,没有可序列化选项的 remark 和 rehype 插件暂时无法与 Turbopack 一起使用
¥remark and rehype plugins without serializable options cannot be used yet with Turbopack, due to inability to pass JavaScript functions to Rust
远程 MDX
¥Remote MDX
如果你的 MDX 文件或内容位于其他位置,你可以在服务器上动态获取它。这对于存储在 CMS、数据库或任何其他地方的内容很有用。用于此用途的流行社区包是 next-mdx-remote。
¥If your MDX files or content lives somewhere else, you can fetch it dynamically on the server. This is useful for content stored in a CMS, database, or anywhere else. A popular community package for this use is next-mdx-remote.
需要了解:请谨慎操作。MDX 编译为 JavaScript 并在服务器上执行。你应该仅从受信任的来源获取 MDX 内容,否则这可能会导致远程代码执行 (RCE)。
¥Good to know: Please proceed with caution. MDX compiles to JavaScript and is executed on the server. You should only fetch MDX content from a trusted source, otherwise this can lead to remote code execution (RCE).
以下示例使用 next-mdx-remote:
¥The following example uses next-mdx-remote:
tsx
import { MDXRemote } from 'next-mdx-remote/rsc'

export default async function RemoteMdxPage() {
  // MDX text - can be from a database, CMS, fetch, anywhere...
  const res = await fetch('https://...')
  const markdown = await res.text()
  return <MDXRemote source={markdown} />
}
jsx
import { MDXRemote } from 'next-mdx-remote/rsc'

export default async function RemoteMdxPage() {
  // MDX text - can be from a database, CMS, fetch, anywhere...
  const res = await fetch('https://...')
  const markdown = await res.text()
  return <MDXRemote source={markdown} />
}
导航到 /mdx-page-remote 路由应显示渲染的 MDX。
¥Navigating to the /mdx-page-remote route should display your rendered MDX.
深潜:如何将 Markdown 转换为 HTML?
¥Deep Dive: How do you transform markdown into HTML?
React 本身并不理解 Markdown。首先需要将 Markdown 明文转换为 HTML。这可以通过 remark 和 rehype 来完成。
¥React does not natively understand markdown. The markdown plaintext needs to first be transformed into HTML. This can be accomplished with remark and rehype.
remark 是一个围绕 Markdown 的工具生态系统。rehype 是相同的,但用于 HTML。例如,以下代码片段将 markdown 转换为 HTML:
¥remark is an ecosystem of tools around markdown. rehype is the same, but for HTML. For example, the following code snippet transforms markdown into HTML:
js
import { unified } from 'unified'
import remarkParse from 'remark-parse'
import remarkRehype from 'remark-rehype'
import rehypeSanitize from 'rehype-sanitize'
import rehypeStringify from 'rehype-stringify'

main()

async function main() {
  const file = await unified()
    .use(remarkParse) // Convert into markdown AST
    .use(remarkRehype) // Transform to HTML AST
    .use(rehypeSanitize) // Sanitize HTML input
    .use(rehypeStringify) // Convert AST into serialized HTML
    .process('Hello, Next.js!')

  console.log(String(file)) // <p>Hello, Next.js!</p>
}
remark 和 rehype 生态系统包含 语法高亮、链接标题、生成目录 等插件。
¥The remark and rehype ecosystem contains plugins for syntax highlighting, linking headings, generating a table of contents, and more.
当使用如上所示的 @next/mdx 时,你不需要直接使用 remark 或 rehype,因为它已经为你处理好了。我们在这里描述它是为了更深入地了解 @next/mdx 包的底层功能。
¥When using @next/mdx as shown above, you do not need to use remark or rehype directly, as it is handled for you. We're describing it here for a deeper understanding of what the @next/mdx package is doing underneath.
使用基于 Rust 的 MDX 编译器(实验性)
¥Using the Rust-based MDX compiler (experimental)
Next.js 支持用 Rust 编写的新 MDX 编译器。该编译器仍处于实验阶段,不建议用于生产使用。要使用新的编译器,你需要在将 next.config.js 传递给 withMDX 时对其进行配置:
¥Next.js supports a new MDX compiler written in Rust. This compiler is still experimental and is not recommended for production use. To use the new compiler, you need to configure next.config.js when you pass it to withMDX:
js
module.exports = withMDX({
  experimental: {
    mdxRs: true,
  },
})
mdxRs 还接受一个对象来配置如何转换 mdx 文件。
¥mdxRs also accepts an object to configure how to transform mdx files.
js
module.exports = withMDX({
  experimental: {
    mdxRs: {
      jsxRuntime?: string            // Custom jsx runtime
      jsxImportSource?: string       // Custom jsx import source,
      mdxType?: 'gfm' | 'commonmark' // Configure what kind of mdx syntax will be used to parse & transform
    },
  },
})
有用的网址
¥Helpful Links